Using the Playground
The Playground is a web-based testing environment where you can experiment with product classifications before integrating with the API or MCP server. It’s the fastest way to see how Product Classifier handles your products and to dial in your configuration.
What the Playground Does
Use the Playground to:
- Test product descriptions : See how the AI categorizes your products in real-time
- Experiment with settings : Try different taxonomies, custom instructions, and pipeline options
- Validate your approach : Ensure your configuration produces the results you need
Once you’ve perfected your setup, apply the same settings to your API requests or MCP server for consistent production results.
How to Use the Playground
Enter a Product Description
Type or paste your product description into the description field. The AI works best with complete, self-contained descriptions that include:
- Product name and brand : “Apple iPhone 16 Pro” or “Dyson V15 Detect”
- Key features : Materials, specifications, distinctive characteristics
- Use cases : What the product does or who it’s for
- Context : Any details that clarify the product type
A complete description might be brief (“Leather wallet with RFID blocking”) or detailed (“Dyson V15 Detect cordless vacuum with laser dust detection, 60-minute runtime, and HEPA filtration”), depending on the product’s complexity.
Example: Complete vs Incomplete
Complete: “Nike Air Max 270 running shoes with Air cushioning technology. Breathable mesh upper, foam midsole, and rubber outsole. Designed for daily training and casual wear.”
Incomplete: “Shoes”
The first description gives the AI everything it needs. The second leaves too much ambiguity.
Adjust Settings (Optional)
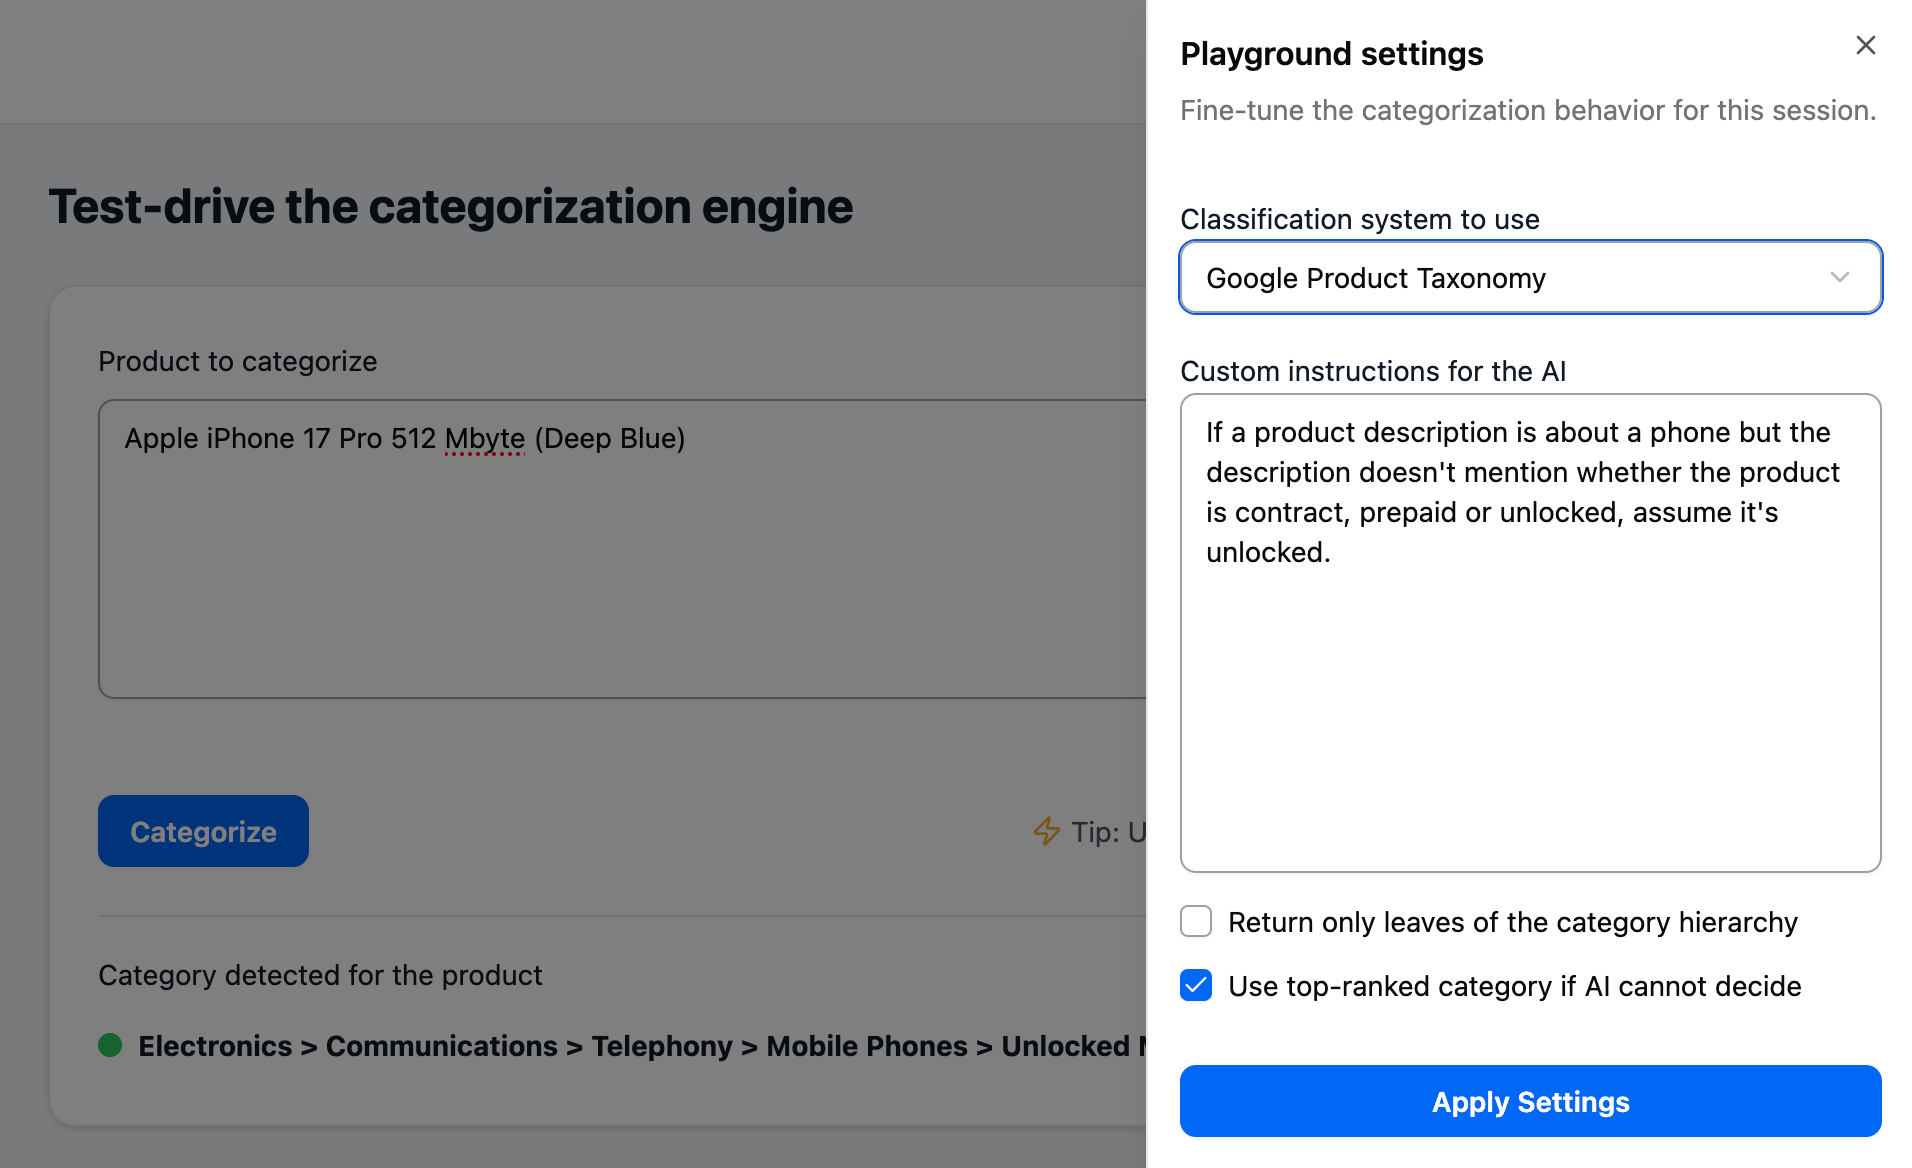
Click the Settings button in the top-right corner to configure:
- Taxonomy : Choose Shopify or Google Product Taxonomy
- Custom instructions : Guide the AI’s decision-making with natural language prompts
- Leaf-only mode : Require leaf categories only
- Top-ranked fallback : Return highest-scored category when AI cannot decide
Default settings work fine for initial testing. For detailed explanations of each setting and how they work together, see Classification Pipeline and Settings.
Click Categorize
The AI analyzes your description and returns a result within seconds. You’ll see a status indicator and category information:
- 🟢 Green : AI-selected category (ideal outcome)
- 🟡 Yellow : Top-ranked category used (AI couldn’t confidently decide)
- ⚫ Gray : No category found
- 🔴 Red : Error occurred
For an in-depth look at what each status means, what drives confidence levels, and how to interpret patterns across classifications, see Classification Status Indicators.
The Three Tools
The Playground gives you three main tools to refine your classifications:
Classification Pipeline and Settings
The system uses a three-step process to categorize products: generate candidates, AI selection, and optional fallback. Settings like leaf-only mode and top-ranked fallback control how this pipeline behaves.
Different configurations work better for different use cases—from maximizing coverage to prioritizing precision. See Classification Pipeline and Settings for detailed explanations of how the process works and Classification Strategies for recommended configurations.
Custom Instructions
Custom instructions let you guide the AI’s decision-making with natural language prompts. Write them as if coaching a colleague:
- “Classify clothing by material first, style second”
- “Default to unlocked for phones unless description explicitly states contract or pre-paid”
Instructions are powerful for handling edge cases and applying your business logic. See Writing Custom Instructions for comprehensive guidance and examples.
Classification History
Every classification you run is saved in your history. Review past results to identify patterns, track improvements as you refine descriptions and settings, and understand how changes affect outcomes.
Your history also shows status indicators for each classification, helping you spot trends across your product catalog. See Classification Status Indicators for details on interpreting these results.
Testing Best Practices
Effective testing helps you validate accuracy and optimize your configuration before production use.
Start Small, Then Scale
- Test 10-20 representative products : Include a mix of straightforward and complex items
- Note which get green vs yellow vs black results : Identify patterns
- Refine your approach : Adjust descriptions, add custom instructions, or change settings
- Test again : Validate that your changes improved results
- Expand testing : Once satisfied, test a larger sample of 50-100 products
What to Look For
Good signs:
- Most products get green indicators
- Categories match your expectations
- Similar products get consistent classifications
Warning signs:
- Many yellow or black results
- Unexpected categories
- Inconsistent classifications for similar products
If you’re seeing warning signs, the issue usually falls into one of three categories:
- Product descriptions need more detail : Add context, features, or clarifying information
- Settings need adjustment : Try leaf-only mode, top-ranked fallback, or different strategy
- Custom instructions needed : Add guidance for recurring edge cases
Sample Size Recommendations
Initial validation: 10-20 products across different categories
Pre-production testing: 50-100 products representing your full catalog diversity
Ongoing monitoring: Re-test periodically as you add new product types or change your catalog
Testing Different Product Types
Test across:
- Price ranges : Budget and premium products may have different description patterns
- Categories : Ensure accuracy across your taxonomy breadth
- Languages : If selling internationally, test each language separately
- Complexity : Both straightforward items and ambiguous products
Iteration Workflow
- Establish baseline : Run initial tests with default settings
- Identify issues : Note which products fail or return unexpected results
- Make one change at a time : Adjust description, setting, or instruction
- Test the same products again : Confirm the change improved results
- Repeat : Continue until you’re satisfied with accuracy
Making one change at a time helps you understand what actually improves results.
When You’re Ready
Once you’re consistently getting:
- Categories you expect
- Mostly green indicators
- Reliable results across product types
Apply your Playground configuration to your API integration. The same settings (taxonomy, custom instructions, leaf-only, top-ranked) work identically in API requests.
Next Steps
After testing classifications and refining your configuration:
- Review the API documentation to automate classification at scale
- Create an API key to integrate Product Classifier into your systems
- Set up the MCP server to integrate Product Classifier into agentic AI workflows
Your Playground configuration—taxonomy choice, custom instructions, and settings—can be replicated exactly in your API requests for consistent results.